快速搭建Kubernetes高可用集群二 Kubeadm 初始化集群
一、 写作背景
近来工作需要,预将公司现有应用服务 Docker 化,并使用 Kubernetes 进行统一资源编排,现将部署过程记录一下。
Kubernetes 环境采用 Kubeadm 进行部署
Kubeadm 是一个工具,它提供了 kubeadm init 以及 kubeadm join 这两个命令作为快速创建 kubernetes 集群的最佳实践。
kubeadm 通过执行必要的操作来启动和运行一个最小可用的集群。它被故意设计为只关心启动集群,而不是准备节点环境的工作。同样的,诸如安装各种各样的可有可无的插件,例如 Kubernetes 控制面板、监控解决方案以及特定云提供商的插件,这些都不在它负责的范围。
Kubeadm可以做什么
- kubeadm init 启动引导一个 Kubernetes 主节点
- kubeadm join 启动引导一个 Kubernetes 工作节点并且将其加入到集群
- kubeadm upgrade 更新 Kubernetes 集群到新版本
- kubeadm config 如果你使用 kubeadm v1.7.x 或者更低版本,你需要对你的集群做一些配置以便使用 kubeadm upgrade 命令
- kubeadm token 使用 kubeadm join 来管理令牌
- kubeadm reset 还原之前使用 kubeadm init 或者 kubeadm join 对节点所作改变
- kubeadm version 打印出 kubeadm 版本
- kubeadm alpha 预览一组可用的新功能以便从社区搜集反馈
二、 系列文章
- 快速搭建Kubernetes高可用集群一 基础环境初始化
- 快速搭建Kubernetes高可用集群二 Kubeadm 初始化集群
- 快速搭建Kubernetes高可用集群三 Ingress、Dashboard、Metrics-server
- 快速搭建Kubernetes高可用集群四 Rook-Ceph
- 快速搭建Kubernetes高可用集群五 Harbor
- 快速搭建Kubernetes高可用集群六 Prometheus
- 快速搭建Kubernetes高可用集群七 ELK-stack
三、 K8S 初始化
待系统初始化完成后,即可使用 kubeadm 执行 K8S 初始化。
3.1 查看镜像
查看系统所需镜像,如果没有则提前下载(在所有节点执行)。
# 查看所需镜像
[root@kube-m1 ~]# kubeadm config images list
W0812 10:05:20.074548   17861 configset.go:202] WARNING: kubeadm cannot validate component configs for API groups [kubelet.config.k8s.io kubeproxy.config.k8s.io]
k8s.gcr.io/kube-apiserver:v1.18.6
k8s.gcr.io/kube-controller-manager:v1.18.6
k8s.gcr.io/kube-scheduler:v1.18.6
k8s.gcr.io/kube-proxy:v1.18.6
k8s.gcr.io/pause:3.2
k8s.gcr.io/etcd:3.4.3-0
k8s.gcr.io/coredns:1.6.7

# 查看已有镜像
[root@kube-m1 ~]# docker images
REPOSITORY                           TAG                 IMAGE ID            CREATED             SIZE
k8s.gcr.io/kube-proxy                v1.18.6             c3d62d6fe412        3 weeks ago         117MB
k8s.gcr.io/kube-controller-manager   v1.18.6             ffce5e64d915        3 weeks ago         162MB
k8s.gcr.io/kube-apiserver            v1.18.6             56acd67ea15a        3 weeks ago         173MB
k8s.gcr.io/kube-scheduler            v1.18.6             0e0972b2b5d1        3 weeks ago         95.3MB
k8s.gcr.io/pause                     3.2                 80d28bedfe5d        5 months ago        683kB
k8s.gcr.io/coredns                   1.6.7               67da37a9a360        6 months ago        43.8MB
k8s.gcr.io/etcd                      3.4.3-0             303ce5db0e90        9 months ago        288MB
3.2 执行初始化命令
1、在任意一个 Master 节点执行,如无特别说明,均在 kube-m1.gxsk.uat 上执行
查看并根据实际情况修改 kubeadm-config.yaml 文件,该文件是系统初始化时自动生成的,如果前面没有出现失误的话,建议不用修改这个文件。
cat /etc/kubernetes/kubeadm-config.yaml
apiVersion: kubeadm.k8s.io/v1beta2
kind: ClusterConfiguration
kubernetesVersion: v1.18.6
controlPlaneEndpoint: 172.17.0.150:8443
imageRepository: k8s.gcr.io
etcd:
  external:
    endpoints:
    - https://172.17.0.151:2379
    - https://172.17.0.152:2379
    - https://172.17.0.153:2379
    caFile: /etc/etcd/ssl/etcd-ca.pem
    certFile: /etc/etcd/ssl/etcd.pem
    keyFile: /etc/etcd/ssl/etcd-key.pem
networking:
  podSubnet: 10.244.0.0/16

---
apiVersion: kubeproxy.config.k8s.io/v1alpha1
kind: KubeProxyConfiguration
mode: ipvs
2、执行初始化命令,完成系统初始化, --config 系统初始化配置文件, --upload-certs 自动生成 SSL 证书
kubeadm init --config /etc/kubernetes/kubeadm-config.yaml --upload-certs
[root@kube-m1 ~]# kubeadm init --config /etc/kubernetes/kubeadm-config.ymal --upload-certs
W0812 11:00:36.277280   24872 configset.go:202] WARNING: kubeadm cannot validate component configs for API groups [kubelet.config.k8s.io kubeproxy.config.k8s.io]
[init] Using Kubernetes version: v1.18.6
[preflight] Running pre-flight checks
[preflight] Pulling images required for setting up a Kubernetes cluster
[preflight] This might take a minute or two, depending on the speed of your internet connection
[preflight] You can also perform this action in beforehand using 'kubeadm config images pull'
[kubelet-start] Writing kubelet environment file with flags to file "/var/lib/kubelet/kubeadm-flags.env"
[kubelet-start] Writing kubelet configuration to file "/var/lib/kubelet/config.yaml"
[kubelet-start] Starting the kubelet
[certs] Using certificateDir folder "/etc/kubernetes/pki"
[certs] Generating "ca" certificate and key
[certs] Generating "apiserver" certificate and key
[certs] apiserver serving cert is signed for DNS names [kube-m1.gxsk.uat kubernetes kubernetes.default kubernetes.default.svc kubernetes.default.svc.cluster.local] and IPs [10.96.0.1 172.17.0.151 172.17.0.150]
[certs] Generating "apiserver-kubelet-client" certificate and key
[certs] Generating "front-proxy-ca" certificate and key
[certs] Generating "front-proxy-client" certificate and key
[certs] External etcd mode: Skipping etcd/ca certificate authority generation
[certs] External etcd mode: Skipping etcd/server certificate generation
[certs] External etcd mode: Skipping etcd/peer certificate generation
[certs] External etcd mode: Skipping etcd/healthcheck-client certificate generation
[certs] External etcd mode: Skipping apiserver-etcd-client certificate generation
[certs] Generating "sa" key and public key
[kubeconfig] Using kubeconfig folder "/etc/kubernetes"
[endpoint] WARNING: port specified in controlPlaneEndpoint overrides bindPort in the controlplane address
[kubeconfig] Writing "admin.conf" kubeconfig file
[endpoint] WARNING: port specified in controlPlaneEndpoint overrides bindPort in the controlplane address
[kubeconfig] Writing "kubelet.conf" kubeconfig file
[endpoint] WARNING: port specified in controlPlaneEndpoint overrides bindPort in the controlplane address
[kubeconfig] Writing "controller-manager.conf" kubeconfig file
[endpoint] WARNING: port specified in controlPlaneEndpoint overrides bindPort in the controlplane address
[kubeconfig] Writing "scheduler.conf" kubeconfig file
[control-plane] Using manifest folder "/etc/kubernetes/manifests"
[control-plane] Creating static Pod manifest for "kube-apiserver"
[control-plane] Creating static Pod manifest for "kube-controller-manager"
W0812 11:00:39.488616   24872 manifests.go:225] the default kube-apiserver authorization-mode is "Node,RBAC"; using "Node,RBAC"
[control-plane] Creating static Pod manifest for "kube-scheduler"
W0812 11:00:39.489727   24872 manifests.go:225] the default kube-apiserver authorization-mode is "Node,RBAC"; using "Node,RBAC"
[wait-control-plane] Waiting for the kubelet to boot up the control plane as static Pods from directory "/etc/kubernetes/manifests". This can take up to 4m0s
[apiclient] All control plane components are healthy after 34.011506 seconds
[upload-config] Storing the configuration used in ConfigMap "kubeadm-config" in the "kube-system" Namespace
[kubelet] Creating a ConfigMap "kubelet-config-1.18" in namespace kube-system with the configuration for the kubelets in the cluster
[upload-certs] Storing the certificates in Secret "kubeadm-certs" in the "kube-system" Namespace
[upload-certs] Using certificate key:
76ceeda43cf2613a7657378622c586f507a425a12c62c9b2a8bfb5308b0bb9b7
[mark-control-plane] Marking the node kube-m1.gxsk.uat as control-plane by adding the label "node-role.kubernetes.io/master=''"
[mark-control-plane] Marking the node kube-m1.gxsk.uat as control-plane by adding the taints [node-role.kubernetes.io/master:NoSchedule]
[bootstrap-token] Using token: 8qrlzv.faq5cmqv7g3gp6cg
[bootstrap-token] Configuring bootstrap tokens, cluster-info ConfigMap, RBAC Roles
[bootstrap-token] configured RBAC rules to allow Node Bootstrap tokens to get nodes
[bootstrap-token] configured RBAC rules to allow Node Bootstrap tokens to post CSRs in order for nodes to get long term certificate credentials
[bootstrap-token] configured RBAC rules to allow the csrapprover controller automatically approve CSRs from a Node Bootstrap Token
[bootstrap-token] configured RBAC rules to allow certificate rotation for all node client certificates in the cluster
[bootstrap-token] Creating the "cluster-info" ConfigMap in the "kube-public" namespace
[kubelet-finalize] Updating "/etc/kubernetes/kubelet.conf" to point to a rotatable kubelet client certificate and key
[addons] Applied essential addon: CoreDNS
[endpoint] WARNING: port specified in controlPlaneEndpoint overrides bindPort in the controlplane address
[addons] Applied essential addon: kube-proxy
节点控制面板访问方式,在节点上执行以下命令后,即可在命令行使用 kubectl 访问 k8s 集群。
# Your Kubernetes control-plane has initialized successfully!

# To start using your cluster, you need to run the following as a regular user:

mkdir -p $HOME/.kube
sudo cp -i /etc/kubernetes/admin.conf $HOME/.kubeconfig
sudo chown $(id -u):$(id -g) $HOME/.kube/config
为集群部署网络
You should now deploy a pod network to the cluster.
Run "kubectl apply -f [podnetwork].yaml" with one of the options listed at:
  https://kubernetes.io/docs/concepts/cluster-administration/addons/
添加其它主节点
You can now join any number of the control-plane node running the following command on each as root:
kubeadm join 172.17.0.150:8443 --token j2tz5v.c9dyz9jjgls029jf \
  --discovery-token-ca-cert-hash sha256:09843b8e9570c970ba306a80153fd1743588300e6f0d25312f6b886ac3a34d5c \
  --control-plane --certificate-key 8d2e7c1171cbb579ea9915ce81493d9ee4a8a384a2dd73dd17752aa8150f726e
添加工作节点
Then you can join any number of worker nodes by running the following on each as root:
kubeadm join 172.17.0.150:8443 --token j2tz5v.c9dyz9jjgls029jf \
    --discovery-token-ca-cert-hash sha256:09843b8e9570c970ba306a80153fd1743588300e6f0d25312f6b886ac3a34d5c
节点添加完成后,执行 kubectl get nodes 查看节点状态
[root@kube-m1 ~]# kubectl get nodes
NAME               STATUS   ROLES    AGE     VERSION
kube-m1.gxsk.uat   Ready    master   16m     v1.18.6
kube-m2.gxsk.uat   Ready    master   11m     v1.18.6
kube-m3.gxsk.uat   Ready    master   8m19s   v1.18.6
kube-n1.gxsk.uat   Ready    <none>   3m51s   v1.18.6
kube-n2.gxsk.uat   Ready    <none>   3m51s   v1.18.6
kube-n3.gxsk.uat   Ready    <none>   3m50s   v1.18.6
kube-n4.gxsk.uat   Ready    <none>   3m54s   v1.18.6
kube-n5.gxsk.uat   Ready    <none>   3m51s   v1.18.6
kube-n6.gxsk.uat   Ready    <none>   3m53s   v1.18.6
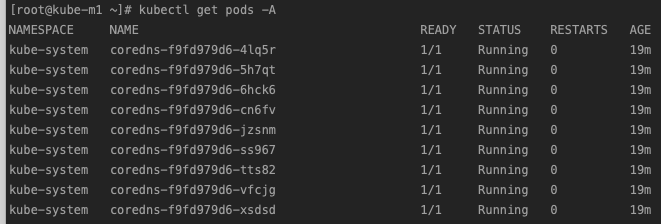
执行kubectl get pods -A 查看所有 pod 状态
[root@kube-m1 ~]# kubectl get pods -A
NAMESPACE     NAME                                       READY   STATUS              RESTARTS   AGE
kube-system   coredns-66bff467f8-p99pw                   0/1     ContainerCreating   0          15m
kube-system   coredns-66bff467f8-vv6cb                   0/1     ContainerCreating   0          15m
kube-system   kube-apiserver-kube-m1.gxsk.uat            1/1     Running             0          16m
kube-system   kube-apiserver-kube-m2.gxsk.uat            1/1     Running             0          10m
kube-system   kube-apiserver-kube-m3.gxsk.uat            1/1     Running             0          6m36s
kube-system   kube-controller-manager-kube-m1.gxsk.uat   1/1     Running             0          16m
kube-system   kube-controller-manager-kube-m2.gxsk.uat   1/1     Running             0          10m
kube-system   kube-controller-manager-kube-m3.gxsk.uat   1/1     Running             0          6m31s
kube-system   kube-proxy-22tp5                           1/1     Running             0          15m
kube-system   kube-proxy-2dxc9                           1/1     Running             0          3m28s
kube-system   kube-proxy-9qjbm                           1/1     Running             0          3m29s
kube-system   kube-proxy-h7dhf                           1/1     Running             0          3m29s
kube-system   kube-proxy-hmh7v                           1/1     Running             0          3m29s
kube-system   kube-proxy-pr5bc                           1/1     Running             0          10m
kube-system   kube-proxy-rddnk                           1/1     Running             0          3m32s
kube-system   kube-proxy-v7sbb                           1/1     Running             0          3m31s
kube-system   kube-proxy-zn55w                           1/1     Running             0          7m56s
kube-system   kube-scheduler-kube-m1.gxsk.uat            1/1     Running             0          16m
kube-system   kube-scheduler-kube-m2.gxsk.uat            1/1     Running             0          10m
kube-system   kube-scheduler-kube-m3.gxsk.uat            1/1     Running             0          6m45s
命令执行后显示 coredns 未处于Running状态,是因为未安装网络插件。
3.3 安装网络插件
网络插件使用 Coreos 的 flannel 插件配置文件下载地址是:github-coreos-flannel
下载后使用 kubectl apply -f /etc/kubernetes/kube-flannel.yaml 安装
kubectl apply -f /etc/kubernetes/kube-flannel.yaml
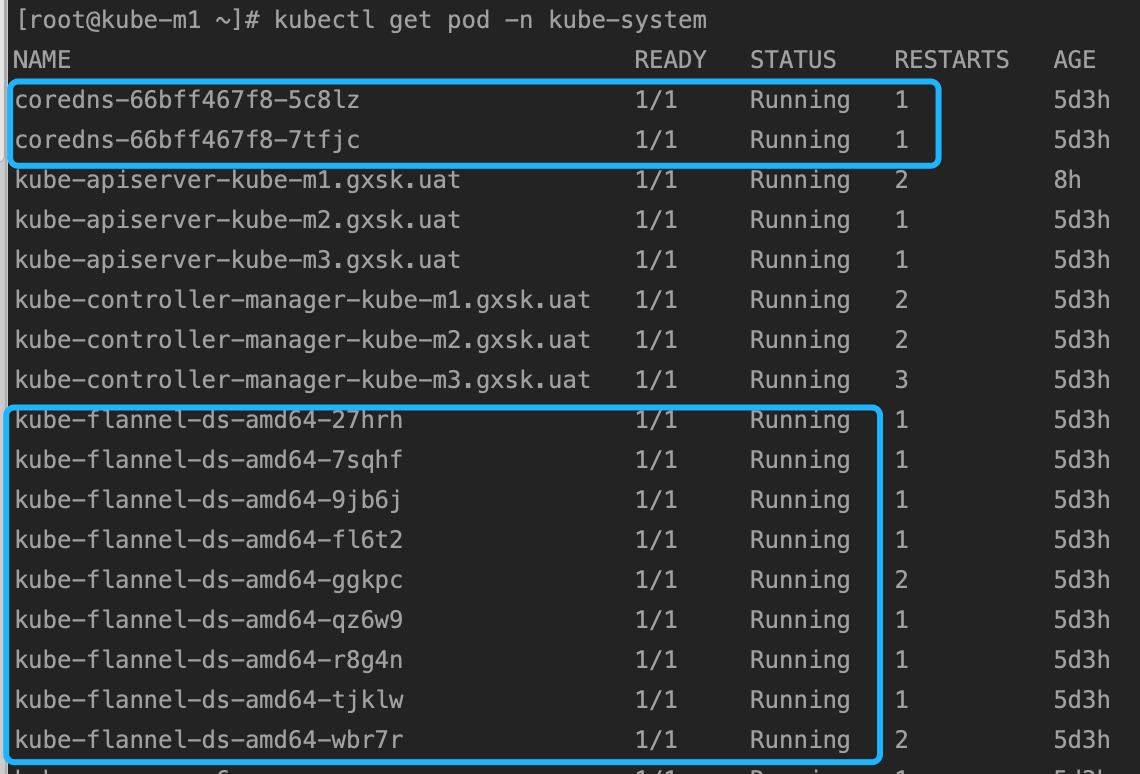
网络插件安装后,发现 coredns 这个 pod 有两个副本,都部署在 kube-m1 这台服务器上,为了保证高可用,我们可以使用 scale 命令重新部署一下 pod。
# 先将 pod 数量设置为0 或者 1,然后添加到指定数量。

kubectl -n kube-system scale --replicas=0 deployment coredns

kubectl -n kube-system scale --replicas=9 deployment coredns
至此,一个基本的 kubernetes 集群就搭建完毕了,为了可视化管理、服务暴露、集群监控等,我们需要对集群进行下一步升级。
四 参考文章