环境准备
1、Centos系统:CentOS7系统安装
2、Nginx软件: Nginx基本配置
3、Jenkins软件: JenKins官网
软件安装
安装JDK环境
在Oracle 官网下载JDK,然后上传到服务器上安装。
或者使用在线下载:
wget --no-cookies --header "Cookie: oraclelicense=accept-securebackup-cookie;" http://download.oracle.com/otn-pub/java/jdk/8u152-b16/aa0333dd3019491ca4f6ddbe78cdb6d0/jdk-8u152-linux-x64.rpm
使用以下命令安装
rpm -ivh jdk-8u152-linux-x64.rpm
或者
yum localinstall jdk-8u152-linux-x64.rpm
安装Jenkins
# 添加yum源
wget -O /etc/yum.repos.d/jekins.repo http://pkg.jenkins.io/redhat/jenkins.repo

#添加密钥
rpm --import https://pkg.jenkins.io/redhat/jenkins.io.key

#安装Jenkins
yum install jenkins

# 如果8080端口被占用,则需要修改 `/etc/sysconfig/jenkins` 配置文件。

vi +56 /etc/sysconfig/jenkins

# 修改 8080 端口为其它端口。
JENKINS_PORT="8081"

# 启动服务

systemctl start jenkins
配置
配置Nginx代理
在Nginx配置目录下添加 jenkins.conf 配置文件
vim /etc/nginx/default.d/jenkins.conf
输入以下内容,中文注释是需要修改的地方,其它位置尽量保持默认。
server {
  listen          80;       # Listen on port 80 for IPv4 requests

  server_name     jenkins.example.com;# Jenkins服务域名

  #this is the jenkins web root directory (mentioned in the /etc/default/jenkins file)
  root            /var/run/jenkins/war/;

  access_log      /var/log/nginx/jenkins/access.log;#日志路径,需手动添加目录
  error_log       /var/log/nginx/jenkins/error.log;
  ignore_invalid_headers off; #pass through headers from Jenkins which are considered invalid by Nginx server.

  location ~ "^/static/[0-9a-fA-F]{8}\/(.*)$" {
    #rewrite all static files into requests to the root
    #E.g /static/12345678/css/something.css will become /css/something.css
    rewrite "^/static/[0-9a-fA-F]{8}\/(.*)" /$1 last;
  }

  location /userContent {
    #have nginx handle all the static requests to the userContent folder files
    #note : This is the $JENKINS_HOME dir
root /var/lib/jenkins/;
    if (!-f $request_filename){
      #this file does not exist, might be a directory or a /**view** url
      rewrite (.*) /$1 last;
  break;
    }
sendfile on;
  }

  location @jenkins {
      sendfile off;
      proxy_pass         http://127.0.0.1:8081;#这个端口要和Jenkins里面的端口保持一致。
      proxy_redirect     default;
      proxy_http_version 1.1;

      proxy_set_header   Host              $host;
      proxy_set_header   X-Real-IP         $remote_addr;
      proxy_set_header   X-Forwarded-For   $proxy_add_x_forwarded_for;
      proxy_set_header   X-Forwarded-Proto $scheme;
      proxy_max_temp_file_size 0;

      #this is the maximum upload size
      client_max_body_size       10m;
      client_body_buffer_size    128k;

      proxy_connect_timeout      90;
      proxy_send_timeout         90;
      proxy_read_timeout         90;
      proxy_request_buffering    off; # Required for HTTP CLI commands in Jenkins > 2.54
  }

  location / {
    # Optional configuration to detect and redirect iPhones
    if ($http_user_agent ~* '(iPhone|iPod)') {
      rewrite ^/$ /view/iphone/ redirect;
    }

    try_files $uri @jenkins;
  }
}
创建日志保存目录
mkdir -p /var/log/nginx/jenkins/
重新加载 nginx服务
测试配置文件
nginx -t
重启加载
nginx -s reload
或者重启服务
systemctl restart nginx

Jenkins系统初始化
1、查看密码文件 获取密码
cat /var/lib/jenkins/secrets/initialAdminPassword

2、登录网站 http://jenkins.longger.net (你的jenkins网站),输入获取的密码。
用户名: admin
密码: 上一步获取的
登录完成后,可以修改用户密码。
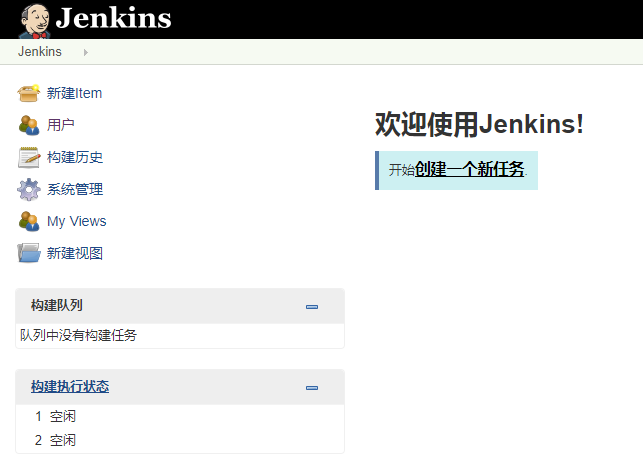
配置Jenkins
-
配置选项
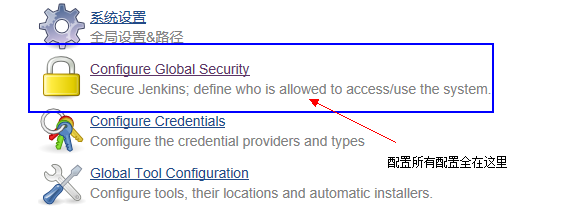
-
LDAP配置
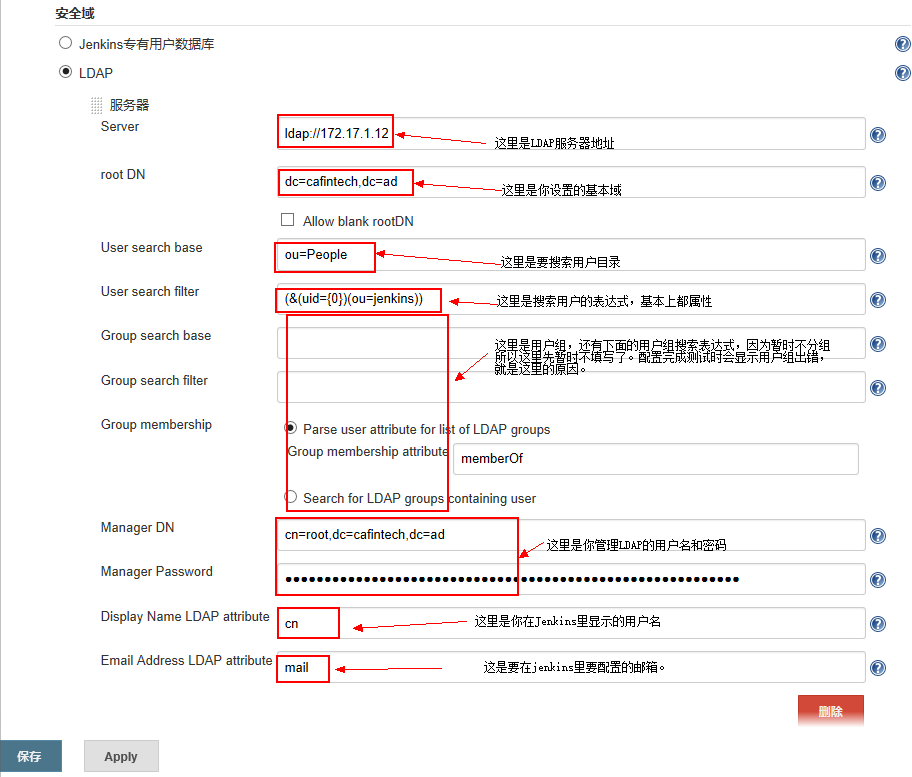
-
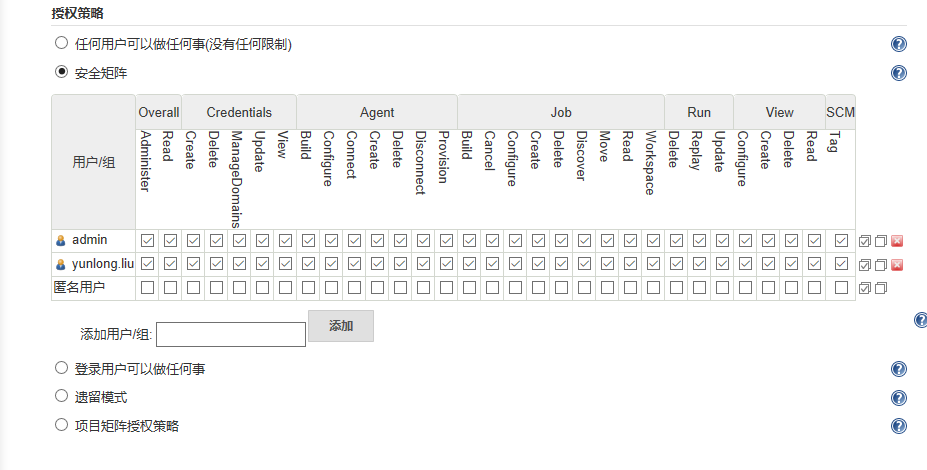
授权策略
在授权策略中默认选择第一项建议改为第二项或第五项,第五项对每个项目做权限控制,第二项对全局做权限控制。
-
如果需要做分组,详细思路见Jira+LDAP集成。
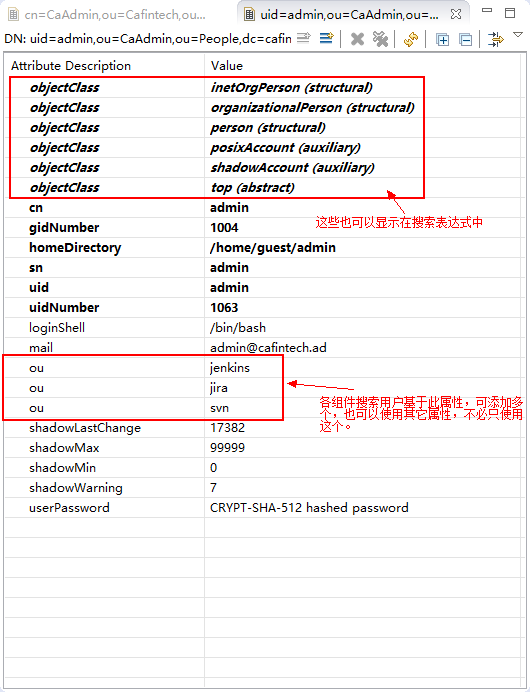
ldap中的配置,需要在要授权访问Jenkins的用户中增加属性如

-
LDAP端配置
文章引用
转载请注明来源,欢迎对文章中的引用来源进行考证,欢迎指出任何有错误或不够清晰的表达。可以在下面评论区评论,也可以邮件至 long@longger.xin


